Flask Intro
Flask is a Python framework for building web apps. It’s small, light and simple compared with the other widely used Python framework, Django.
We will install Flask in a new Python3 virtual environment. Students already have Python3 and venv.
Setup for Flask
We will create a new folder with a new virtual environment for Flask work projects. Various new modules will be installed here.
Create a directory and change into it
The first step is to create a new folder (directory) for all your Flask projects. Mine is here:
Documents/python/flask
Change into that directory. For me, the command would be:
cd Documents/python/flask
Create a new virtual environment in that directory and activate it
At the command prompt (NOT the Python prompt), create a new virtual environment. This is done only once. Make sure you are not already in an activated environment when you do this!
Mac OS
python3 -m venv env
Windows
python -m venv env
Activate the virtual environment:
Mac OS
source env/bin/activate
Windows
env\Scripts\activate.bat
Important
You should now see (env) at the far left side of your prompt. This indicates that the virtual environment is active.
For example, on my Mac I would see this:
(env) mcadams flask $
Tip
If your Mac OS prompt is long and unsightly — unlike the sleek, svelte prompt seen above — you might want to change it.
Install Flask
In Mac OS or Windows, at the command prompt, with your virtual environment already activated, type:
pip install Flask
Note
Uppercase F required.
This is how you install any Python library that exists in the Python Package Index. Pretty handy. pip is a tool for installing Python packages, which is what you just did.
Attention
You installed Flask in the Python3 virtual environment that is currently active. When that virtual environment is not active, Flask will not be available to you. This is ideal, because you will create different virtual environments for different Python projects, and you won’t need to worry about updated libraries in the future breaking your (past) code.
Test Flask
Using Atom, create a file in your flask folder, copy/paste the code into it, and save it with the filename hello.py.
"""test Flask with this"""

from flask import Flask
app = Flask(__name__)

@app.route('/')
def hello():
    return 'Hello World!'
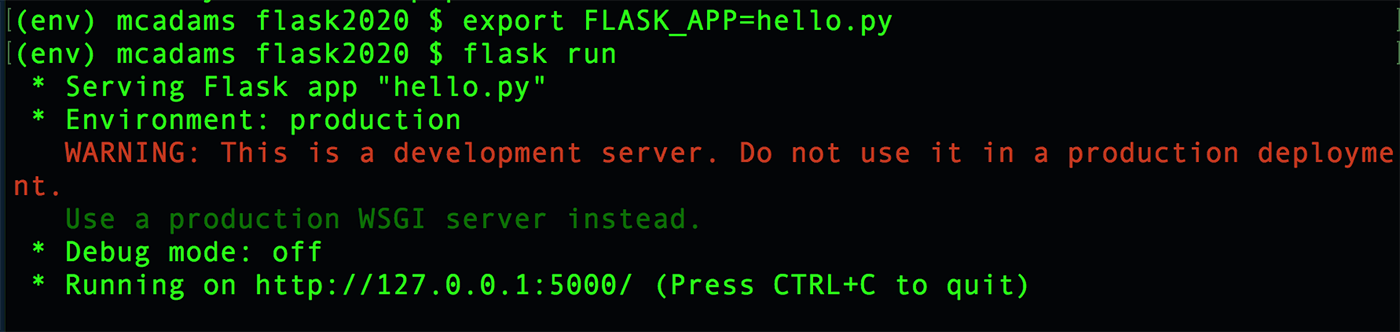
To run that test script, at the command prompt, type this (two lines):
Mac OS
export FLASK_APP=hello.py
flask run
Windows
set FLASK_APP=hello.py
flask run
You’ll see something like this (Mac screen shown; Windows is slightly different):
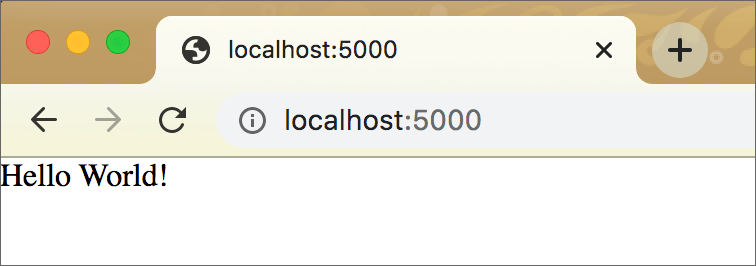
Open a new tab in your web browser and, in the address bar, type: localhost:5000
Flask includes a built-in web server, for development use. The red warning message simply means you should never use this as a live server online.
Attention
If the Hello World page will not open on a Mac, you likely have a port conflict. Exit from the server with Control-C and then run the startup code as shown below.
export FLASK_APP=hello.py
flask run --port 4999
In the browser’s address bar, type: localhost:4999
What you’ve done is:
With the
hello.pyfile, you have written a small (and essentially useless) web app in Flask.With the two commands ending with
flask run, you started the server and ran the app on it.The app caused the string Hello World! to be written into the browser window when the home location of the server was requested (that was you typing
localhost:5000into the address bar).That is, the app received a request sent via the browser software to the server.
Then, the app determined what response to send back to the browser.
To shut down the server, press Control-C in Terminal. (Mac users: That is Control, not Command.)
Flask intro video
Here is an excellent video from a Harvard EdX course. Starting at 40:25, the instructor explains Flask pretty much as I have done in this chapter and in the parts to follow. It is exceptionally clear and well organized.
If you would prefer a video, I highly recommend this:
Flask - Lecture 2 - CS50’s Web Programming with Python and JavaScript
The lecturer begins with a quick review of how HTTP works and then walks through the same test script shown above. Watch until around 48:00.
Deconstruct the code in a small Flask app
Now we will look at the app from above, line by line.
Import Flask and create an application object
We begin here, with two lines you will see in every Flask app:
from flask import Flask
app = Flask(__name__)
The first line is a typical Python import statement. Lowercase flask is a Python library, which you have installed. Uppercase Flask is a class from that library, and it must be imported. As always, case matters, so note the lowercase f and the uppercase F.
The second line, which is new to you, begins with a new variable, app, which will be used in every Flask app. The value of that new variable, Flask(__name__), is a new object that inherits from the class Flask — meaning it gets all the attributes and methods built into that class, which we have imported.
__name__ is a built-in variable in Python. Python has many double-underscore entities, and they always have this pattern: two underscores, a word, and two underscores. These double-underscore entities are referred to with the slang dunder. For __name__, we can say “dunder name.”
What does __name__ do? Every Python module has a name, and __name__ used in a module contains the name of that module. The value of __name__ is not always the filename, as demonstrated in a common Python statement:
if __name__ == '__main__':
When that statement returns True, it means the program (the file) is being run by itself, and was not imported. (We are NOT using that statement in our hello.py code, but this seems like a good time to explain it.)
app = Flask(__name__) creates a Flask application object — app — in the current Python module. A Python module is just a Python file, filename.py. An object (in Python and in other programming languages) is a data type that can include a ton of functions, methods, and attributes. Our variable app now has all of those from Flask. To be specific, app is an instance of a Python class named Flask, which we imported at the top of the file.
Basically, we have brought into this file — this app — all the capabilities of Flask.
Add a route and some action
This next part of your first Flask app is what does the work.
@app.route('/')
def hello():
    return 'Hello World!'
It consists of two parts: the decorator and the function that is “decorated.”
A decorator begins with @ and is a unique feature of the Python language. It modifies the function that follows it. Let that sink in.
The decorator:
@app.route('/')
Remember that
appis a Flask application object. It has all the methods and attributes of the Flask class, and one of those isroute(), which expects to be used in exactly this way — in a decorator.The contents of the parentheses are a path — a partial URL.
Your Flask application will perform different actions depending on which URL is sent to it.
'/'is the root of the website, the top, the home page.@app.route('/index')indicates a URL such aslocalhost:5000/indexor (on a live server)https://mydomain.com/index. Note that there is no file there — no.html.The action that will be performed at that URL depends on what is written in the function that immediately follows the decorator.
The function:
def hello():
    return 'Hello World!'
All this function does is return a simple string: 'Hello World!' Our Flask app performs this action when the server is running, the app is running, and we open localhost:5000 in the browser. (Naturally, a Flask app can run on a live web server.)
Note that there does not need to be any relationship between the decorator and the function except proximity:
@app.route('/')
def hello():
    return 'Hello World!'
Often people writing a Flask app use the same word for the route and the function, like so:
@app.route('/foobar')
def foobar():
    return 'Hi there, foobar!'
There’s nothing wrong with this, but it’s not necessary. Use it if you like it.
Modify hello.py: Add a new route
Add these three lines to your hello.py file and save it.
@app.route('/foobar')
def foobar():
    return '<h1>Hi there, foobar!</h1>'
Repeat the steps from above to run the file and open localhost:5000.
After you see Hello World! in the browser (the same as before), type localhost:5000/foobar into the address bar and press Enter or Return. That is what the new, added route made possible.

It is possible to have many different routes in one Flask app, and each route can do an entirely different thing.
What you know now about Flask
Think about each item below in the context of the code you have just run.
Flask enables us to create an app that runs on a web server.
Entering a URL in a web browser is made operable by a route in a Python decorator.
The value passed into
route()appears in the URL.What happens as a result of an HTTP request to that URL is determined by instructions in the function that is “decorated.”
A value returned by a function in Flask can be written into a web browser window.
You’re ready to move on to Flask, Part 2.