Flask: Write to a Database
In this chapter we focus on writing data to a SQLite database, using Flask-SQLAlchemy.
We will cover:
Add a new record: Create a complete new entry and add it to the database.
Update a record: Retrieve an existing record and allow the user to edit any part of it, then write the changes to the database.
Delete a selected record.
Resources:
The database
We will use the same SQLite database from the chapter Flask: Read from a Database.
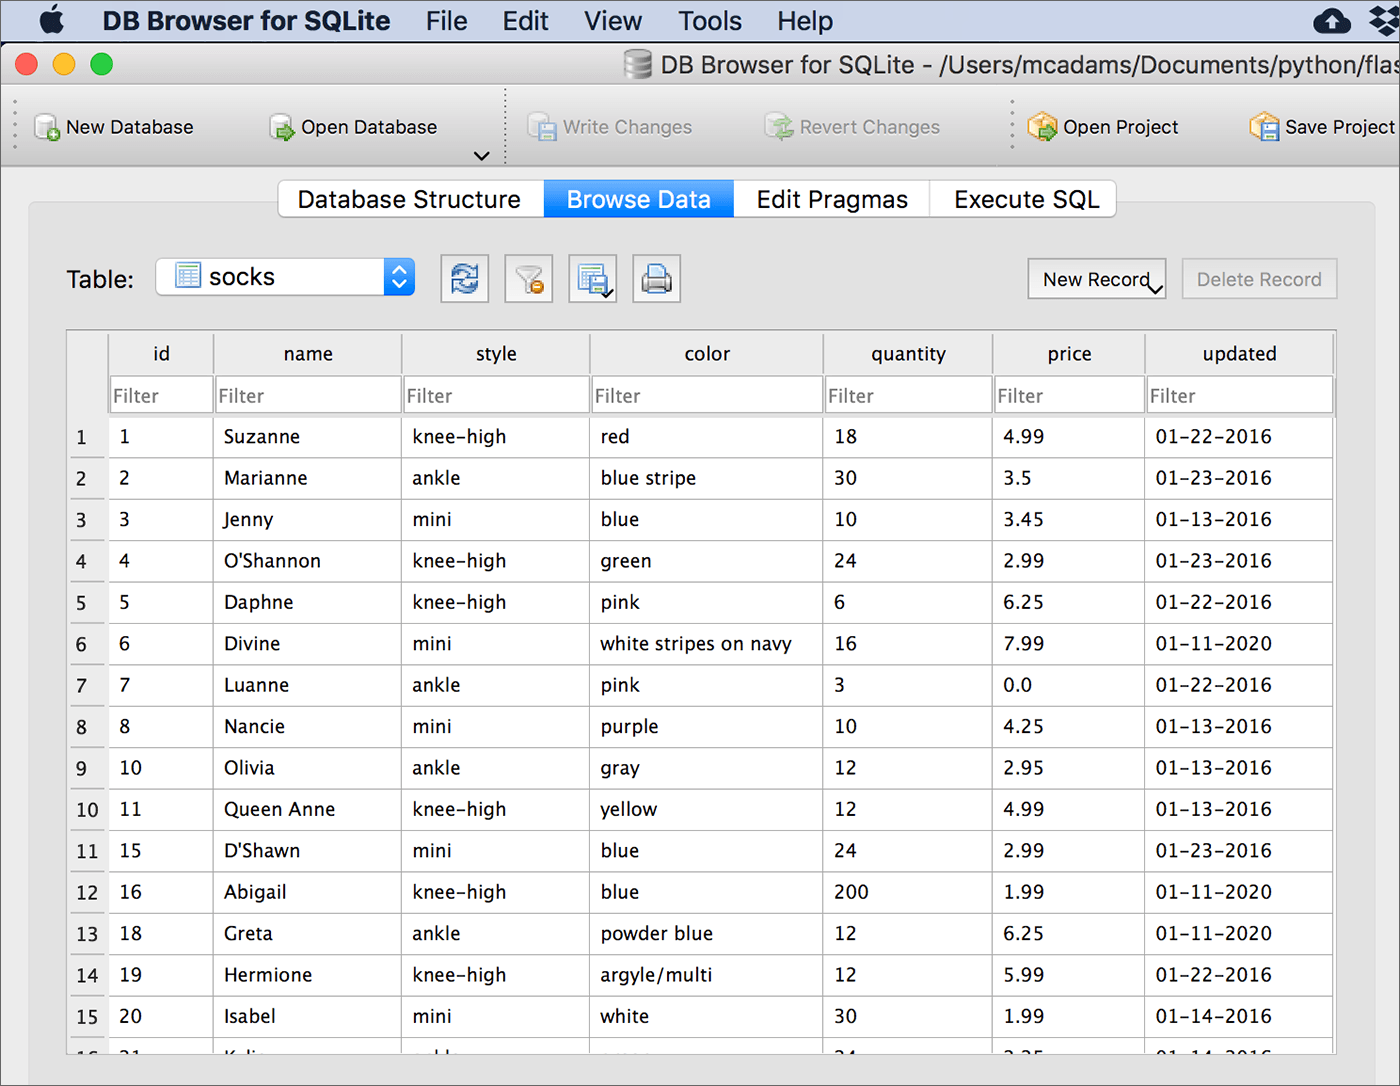
The database is named sockmarket.db. It has only one table, named socks. It has seven fields: id, name, style, color, quantity, price, and updated. You will see the table name and the field names later, in the Python code. The image below is a screenshot from the DB Browser for SQLite, showing the top rows of the socks table.
It is essential to get your database connection working without errors before you try to do more with the database and Flask.
Refer to Flask and Databases to test your database connection.
Add new record to database
To add a new record to the database as part of a Flask app, you will likely use an HTML form similar to this:

The route: localhost:5000/add_record
Flask forms using Flask-WTF and Flask-Bootstrap4 were introduced in the chapter Flask: Web Forms. See the code for this form below.
App setup
The example app we will build here begins with the app completed in the chapter about reading from a database. Now there will be a lot of new imports at the top of the app file:
1 2 3 4 5 6 7 8 9 10 11 12 13 14 15 16 17 18 19 20 21 22 23 24 25 26 27 28 29 30 31 | """ write to a SQLite database with forms, templates
add new record, delete a record, edit/update a record
"""
from flask import Flask, render_template, request, flash
from flask_sqlalchemy import SQLAlchemy
from flask_bootstrap import Bootstrap
from flask_wtf import FlaskForm
from wtforms import SubmitField, SelectField, RadioField, HiddenField, StringField, IntegerField, FloatField
from wtforms.validators import InputRequired, Length, Regexp, NumberRange
from datetime import date
app = Flask(__name__)
# Flask-WTF requires an enryption key - the string can be anything
app.config['SECRET_KEY'] = 'MLXH243GssUWwKdTWS7FDhdwYF56wPj8'
# Flask-Bootstrap requires this line
Bootstrap(app)
# the name of the database; add path if necessary
db_name = 'sockmarket.db'
app.config['SQLALCHEMY_DATABASE_URI'] = 'sqlite:///' + db_name
app.config['SQLALCHEMY_TRACK_MODIFICATIONS'] = True
# this variable, db, will be used for all SQLAlchemy commands
db = SQLAlchemy(app)
|
Line 5: new imports from Flask —
requestandflash. You’ll see these in the first new route.Line 10: new form fields you have not seen before, because the form here has a lot more going on than the simple form in the introductory chapter.
Line 11: new form validators to prevent unwanted values going into your database.
Line 12: import to enable Python to insert a date automatically into your database.
Line 17: required by WTForms; covered in the forms chapter.
Everything else above was covered in previous chapters.
Database table setup
32 33 34 35 36 37 38 39 40 41 42 43 44 45 46 47 48 49 50 51 52 | # each table in the database needs a class to be created for it
# db.Model is required - don't change it
# identify all columns by name and data type
class Sock(db.Model):
__tablename__ = 'socks'
id = db.Column(db.Integer, primary_key=True)
name = db.Column(db.String)
style = db.Column(db.String)
color = db.Column(db.String)
quantity = db.Column(db.Integer)
price = db.Column(db.Float)
updated = db.Column(db.String)
def __init__(self, name, style, color, quantity, price, updated):
self.name = name
self.style = style
self.color = color
self.quantity = quantity
self.price = price
self.updated = updated
|
Lines 35–43 were explained in the chapter about reading from a database. Lines 45–51 were not needed there, but now we need them, or we’ll get an error when we try to write a new record into this table in the database.
__init__() is a reserved method in Python classes. It is called when an object is created from the class, to initialize the properties of the class. Here, it specifies that when we pass values into a new record in this table, the order of the values will be name, style, color, quantity, price, updated. Note that the order matters! You’ll see this in the first new route. self represents the new instance of the class, and everywhere you see it, it needs to stay.
Important
If your app needs to write a new record into more than one table, you’ll need to set up each of those tables in this way also.
The form without validators
As explained in the web forms chapter, we can vastly simplify the template HTML by defining every aspect of a form in a new class in the app script.
class AddRecord(FlaskForm):
    # id used only by update/edit
    id_field = HiddenField()
    name = StringField('Sock name')
    style = SelectField('Choose the sock style',
        choices=[ ('', ''), ('ankle', 'Ankle'),
        ('knee-high', 'Knee-high'),
        ('mini', 'Mini'),
        ('other', 'Other') ])
    color = StringField('Color')
    quantity = IntegerField('Quantity in stock')
    price = FloatField('Retail price per pair')
    # updated - date - handled in the route function
    updated = HiddenField()
    submit = SubmitField('Add/Update Record')
Note
Each different field type here was imported from wtforms at the top of the script file.
See a list of all WTForms field types. Note that they are case-sensitive.
The following might be puzzling:
choices=[]— required for a SelectField. Inside the square brackets are tuples. The first item in a tuple is the value for the database. The second item in a tuple is the text visible in the select menu. These pairs translate into lines like this in the HTML:<option value="ankle">Ankle</option>HiddenField()denotes an HTML form element:<input type="hidden">. This kind of form element is used to pass values that should not be edited or even seen by users, such as a database primary key. Learn more at MDN.
Everything else should be clear if you are familiar with regular HTML forms. Compare the code to the screenshot of the form. The live page is ➡︎ here.
The form with validators
Validators — also imported from wtforms — can get pretty complicated. They can do quite a lot to prevent bad values from being written to your database, though, so it’s worthwhile to learn how to use them.
Below is the same form class with the validators added. This is the class used in the example app.
See a list of all WTForms validators.
class AddRecord(FlaskForm):
    # id used only by update/edit
    id_field = HiddenField()
    name = StringField('Sock name', [ InputRequired(),
        Regexp(r'^[A-Za-z\s\-\']+$', message="Invalid sock name"),
        Length(min=3, max=25, message="Invalid sock name length")
        ])
    style = SelectField('Choose the sock style', [ InputRequired()],
        choices=[ ('', ''), ('ankle', 'Ankle'),
        ('knee-high', 'Knee-high'),
        ('mini', 'Mini'),
        ('other', 'Other') ])
    color = StringField('Color', [ InputRequired(),
        Regexp(r'^[A-Za-z\s\-\'\/]+$', message="Invalid color"),
        Length(min=3, max=25, message="Invalid color length")
        ])
    quantity = IntegerField('Quantity in stock', [ InputRequired(),
        NumberRange(min=1, max=999, message="Invalid range")
        ])
    price = FloatField('Retail price per pair', [ InputRequired(),
        NumberRange(min=1.00, max=99.99, message="Invalid range")
        ])
    # updated - date - handled in the route function
    updated = HiddenField()
    submit = SubmitField('Add/Update Record')
InputRequired()means the field cannot be left empty.Regexp()is used to provide a regular expression, which is a pattern the entered string needs to match. Learn about regular expressions in Python. Themessage=value inside the parentheses will appear if the pattern is not matched.Length()allows us to provide a minimum and maximum length for the string. It also provides amessage=option.NumberRange()allows us to provide a minimum and maximum number for an integer or a float.
Note
Each different validator above was imported from wtforms at the top of the script file.
The route function
The route — like all the code shown above — is in the app script, write_db.py.
The route add_record renders a template that contains the web form discussed above. In the decorator we add methods=['GET', 'POST'] because this template can legitimately open via a regular HTTP request (get) or via a request with form data attached to it (post).
The function has an if/else to handle two different circumstances:
The form on the page has been submitted, and the form data were all valid. (The
validate_on_submit()function returns True.) In that case, we want to send the data to the database.No data will be written to the database. That case actually has two possible conditions:
The form has not yet been filled in and submitted.
The form was submitted, but there is invalid data in one or more fields.
First we’ll look at what happens if the data are valid and are written to the database:
114 115 116 117 118 119 120 121 122 123 124 125 126 127 128 129 130 131 132 133 134 | # add a new sock to the database
@app.route('/add_record', methods=['GET', 'POST'])
def add_record():
form1 = AddRecord()
if form1.validate_on_submit():
name = request.form['name']
style = request.form['style']
color = request.form['color']
quantity = request.form['quantity']
price = request.form['price']
# get today's date from function, above all the routes
updated = stringdate()
# the data to be inserted into Sock model - the table, socks
record = Sock(name, style, color, quantity, price, updated)
# Flask-SQLAlchemy magic adds record to database
db.session.add(record)
db.session.commit()
# create a message to send to the template
message = f"The data for sock {name} has been submitted."
return render_template('add_record.html', message=message)
else:
|
Line 117: Using the form class created above, we create an instance of that form and assign it to the variable
form1.Line 118: The
ifclause runs if the form data were valid. That means we want to write the data to the database.Lines 119–123: Create new variables from the data received from the form.
Line 125: Run a function to create a date string representing today’s date. Assign that string to the new variable
updated.Line 127: Using the model class created above —
Sock— we format the data in the manner expected by the database, following the order in the__init__function. Assign this to a new variable,record.Lines 129–130: This is SQLAlchemy handling everything to securely write to the database. Note that the variable
recordis used in line 129.db.session.commit()is necessary to update your database.Line 132: Create a message to pass to the template. Note that this message only exists if the data were sent to the database.
Line 133: Render the template, passing the message to it.
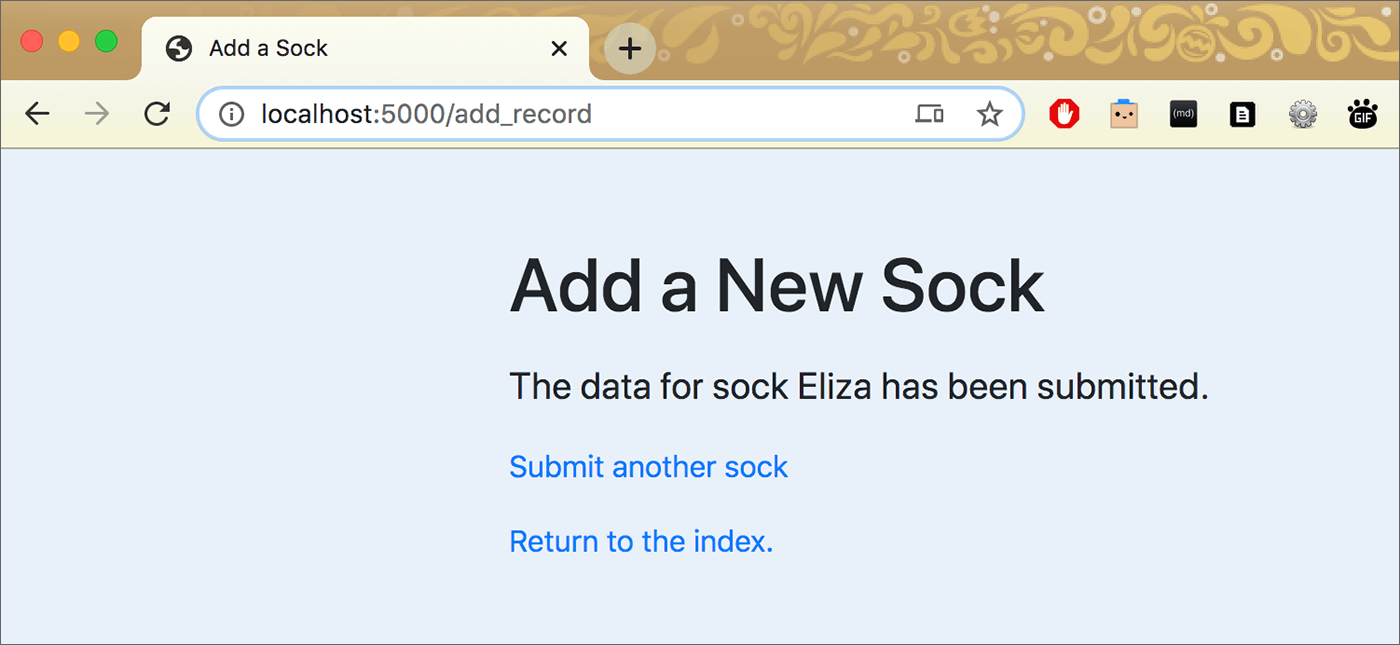
Above, the result of successfully writing to the database renders the template without showing the form. It displays the message, including the name of the sock just submitted.
What happens if data in one or more form fields are invalid when the form is submitted?
Recall that in the form class, validators were added to restrict what can be sent to the database.
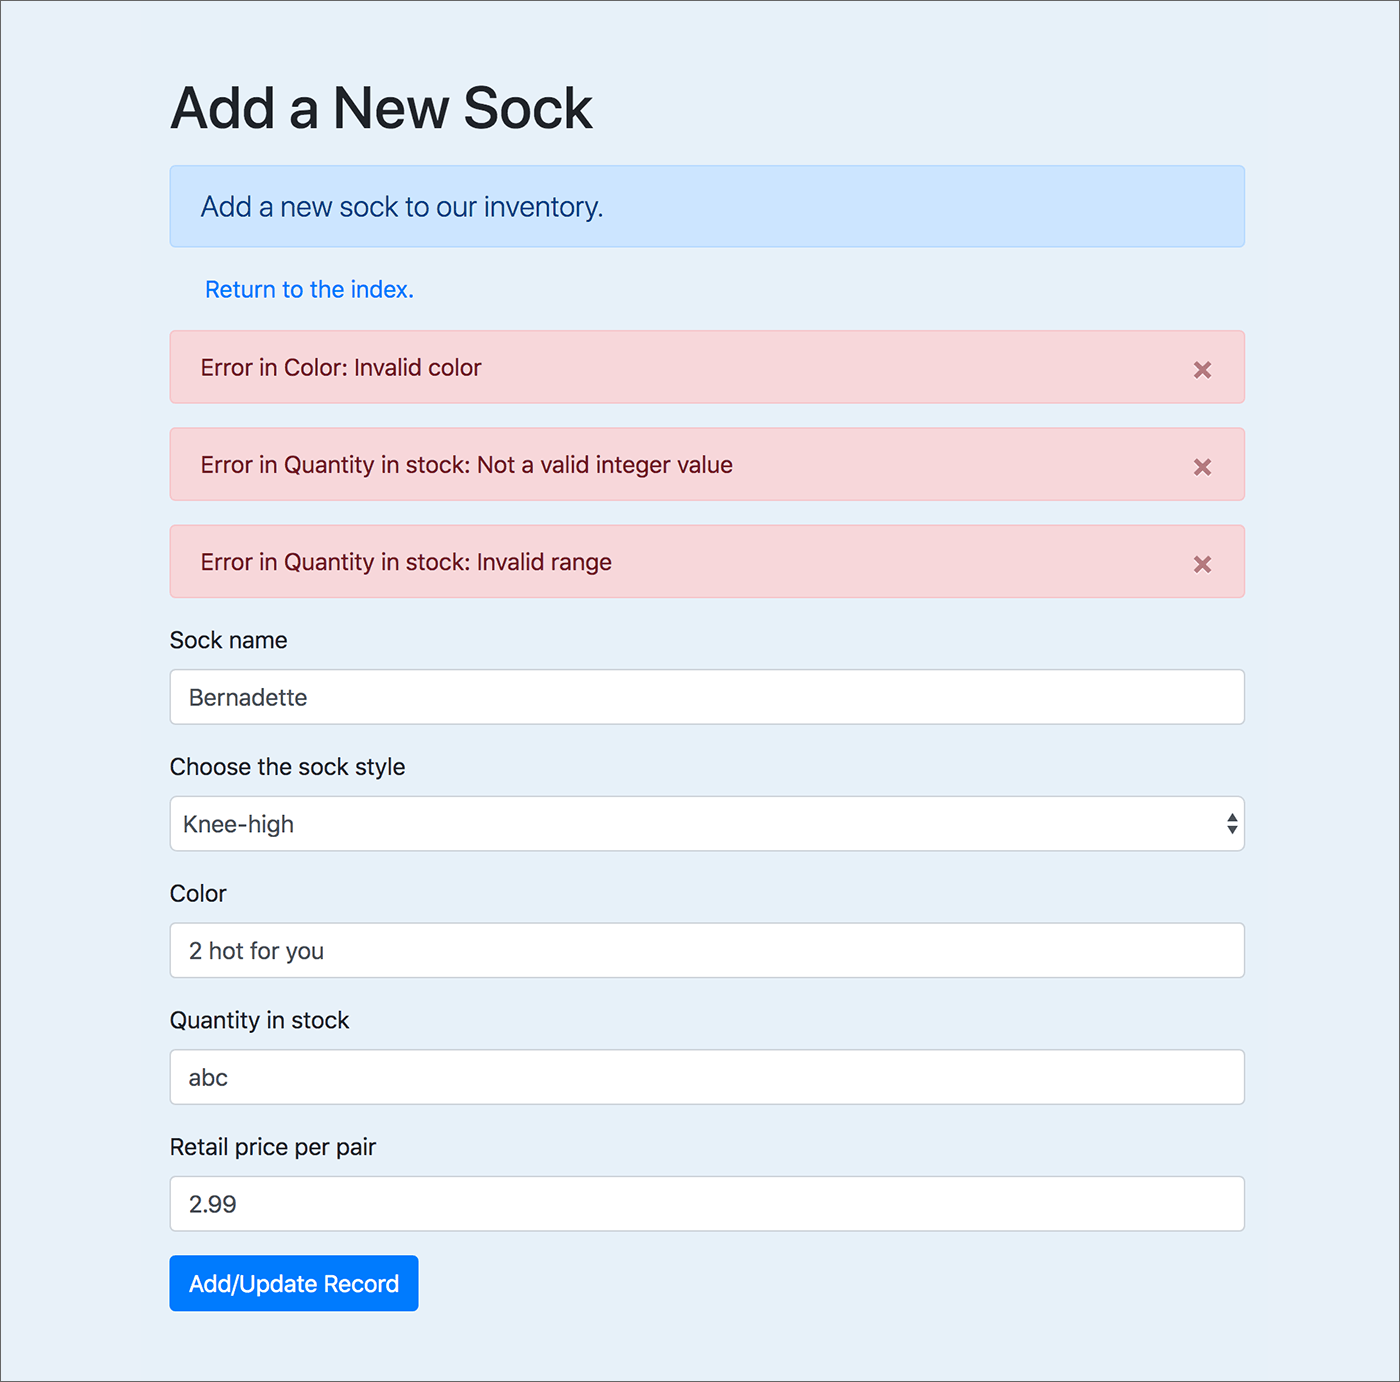
Above, you can see the result of invalid data in two of the form fields. The user can correct the errors and submit the form again. Nothing will be written to the database until all fields contain valid data. This is handled in the second part of the route function — the else clause:
134 135 136 137 138 139 140 141 142 143 144 | else:
# show validaton errors
# see https://pythonprogramming.net/flash-flask-tutorial/
for field, errors in form1.errors.items():
for error in errors:
flash("Error in {}: {}".format(
getattr(form1, field).label.text,
error
), 'error')
return render_template('add_record.html', form1=form1)
|
See the Flask Flash Function Tutorial for details about using flash() and the for-loop in the code above.
Note that the else clause also runs if this page is freshly opened in the browser, with an empty form. In that case, the for-loop runs, but there are no errors — and so no flash() messages will appear on the page.
The form — form1 — must be passed to the template in the return statement (line 143 above).
The template
Because of the flash() messages, this template is a bit complicated.
The top part (lines 26–34) runs only if the data were just written to the database. This is the case where the form is not on the page and the message says the data have been submitted.
The else clause is discussed below.
24 25 26 27 28 29 30 31 32 33 34 35 36 37 38 39 40 41 42 43 44 45 46 47 48 49 50 51 52 53 54 55 56 57 58 59 60 61 62 63 64 | <h1 class="pt-5 pb-2">Add a New Sock</h1>
{% if message %}
<!-- the form was submitted and message exists -->
<p class="lead"><strong>{{ message }}</strong></p>
<!-- links -->
<p><a href="{{ url_for('add_record') }}">Submit another sock.</a></p>
<p><a href="{{ url_for('index') }}">Return to the index.</a></p>
{% else %}
<!-- the form is displayed when template opens via GET not POST -->
<p class="lead alert alert-primary">Add a new sock to our inventory.</p>
<p class="ml-4"><a href="{{ url_for('index') }}">Return to the index.</a></p>
<!-- show flash - based on WTForms validators
see https://pythonprogramming.net/flash-flask-tutorial/
get_flashed_messages() exists here because of flash()
in the route function
-->
{% with errors = get_flashed_messages() %}
{% if errors %}
{% for err in errors %}
<div class="alert alert-danger alert-dismissible" role="alert">
<button type="button" class="close" data-dismiss="alert" aria-label="Close"><span aria-hidden="true">×</span></button>
{{ err }}
</div>
{% endfor %}
{% endif %}
{% endwith %}
<!-- end of flash -->
<!-- the form, thanks to WTForms -->
{{ wtf.quick_form(form1) }}
{% endif %}
|
The key thing to notice in the else clause is that the form is displayed (line 62):
{{ wtf.quick_form(form1) }}
Recall that form1 was passed to the template in the route function.
Lines 49–58 handle the flash() messages that are written if the form is submitted with invalid data. The way this section of code works is explained in this tutorial.
If the page was just opened and the form is empty, unfilled, then there are no flash() messages.
Summary: Add new record
While that probably seems like a lot, note that there are one form, one route, and one template used to create a new record and add it to the database.
The template and the route in this case handle BOTH the form before it has been submitted AND the submission of the form.
That will not be the same when we delete or update a database record in this app.
Delete or update a record
In contrast to adding a new record, either deleting or editing an existing record requires your code to find a specific record that is already in the database. The record must be selected in a way that guarantees only one record will be selected.
In this app, the index page offers an option to select a sock for editing:
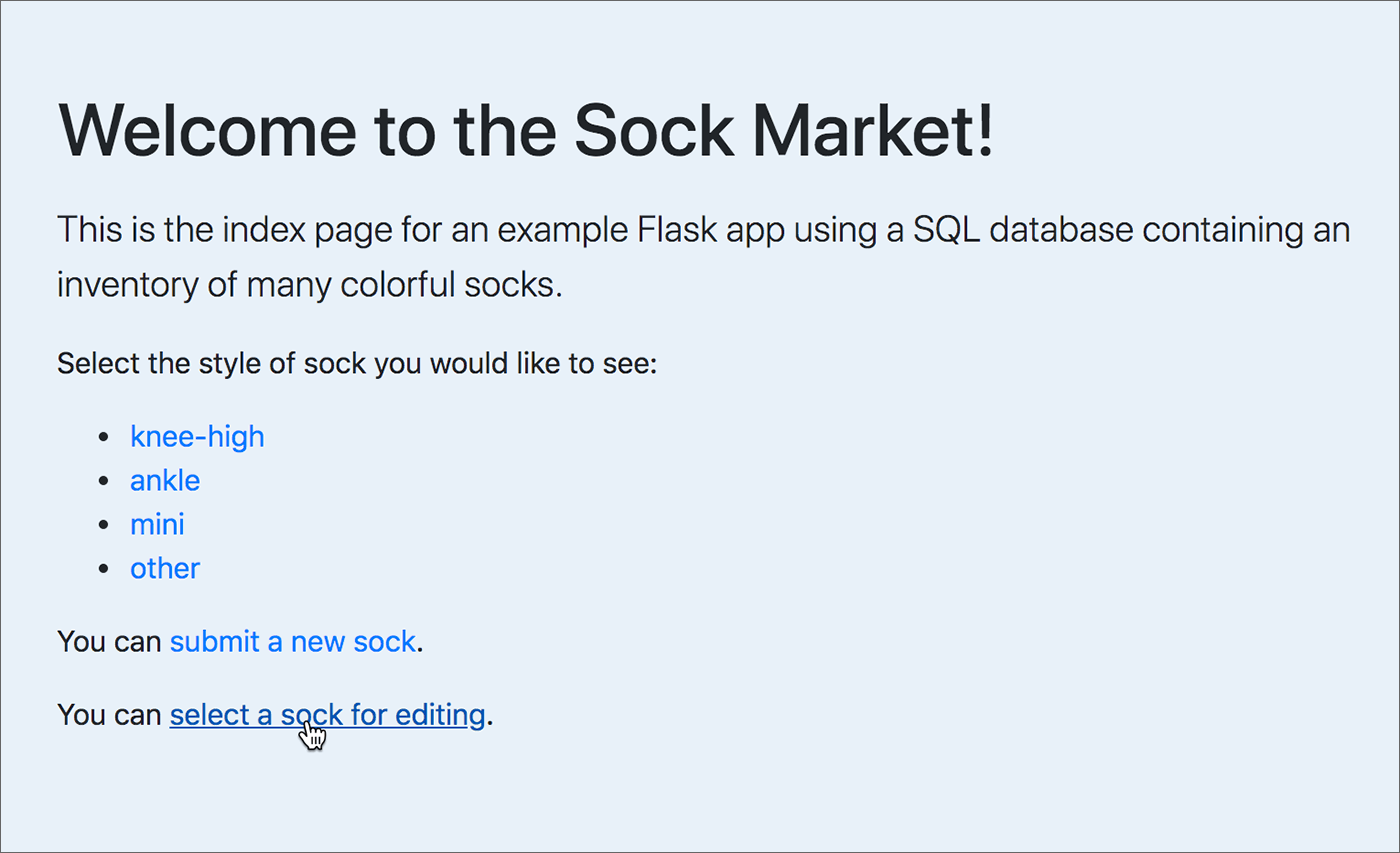
Above: / — route; index() — function; index.html — template
The link opens a page showing socks listed alphabetically by name, with a radio button at left to allow selection of just one sock:
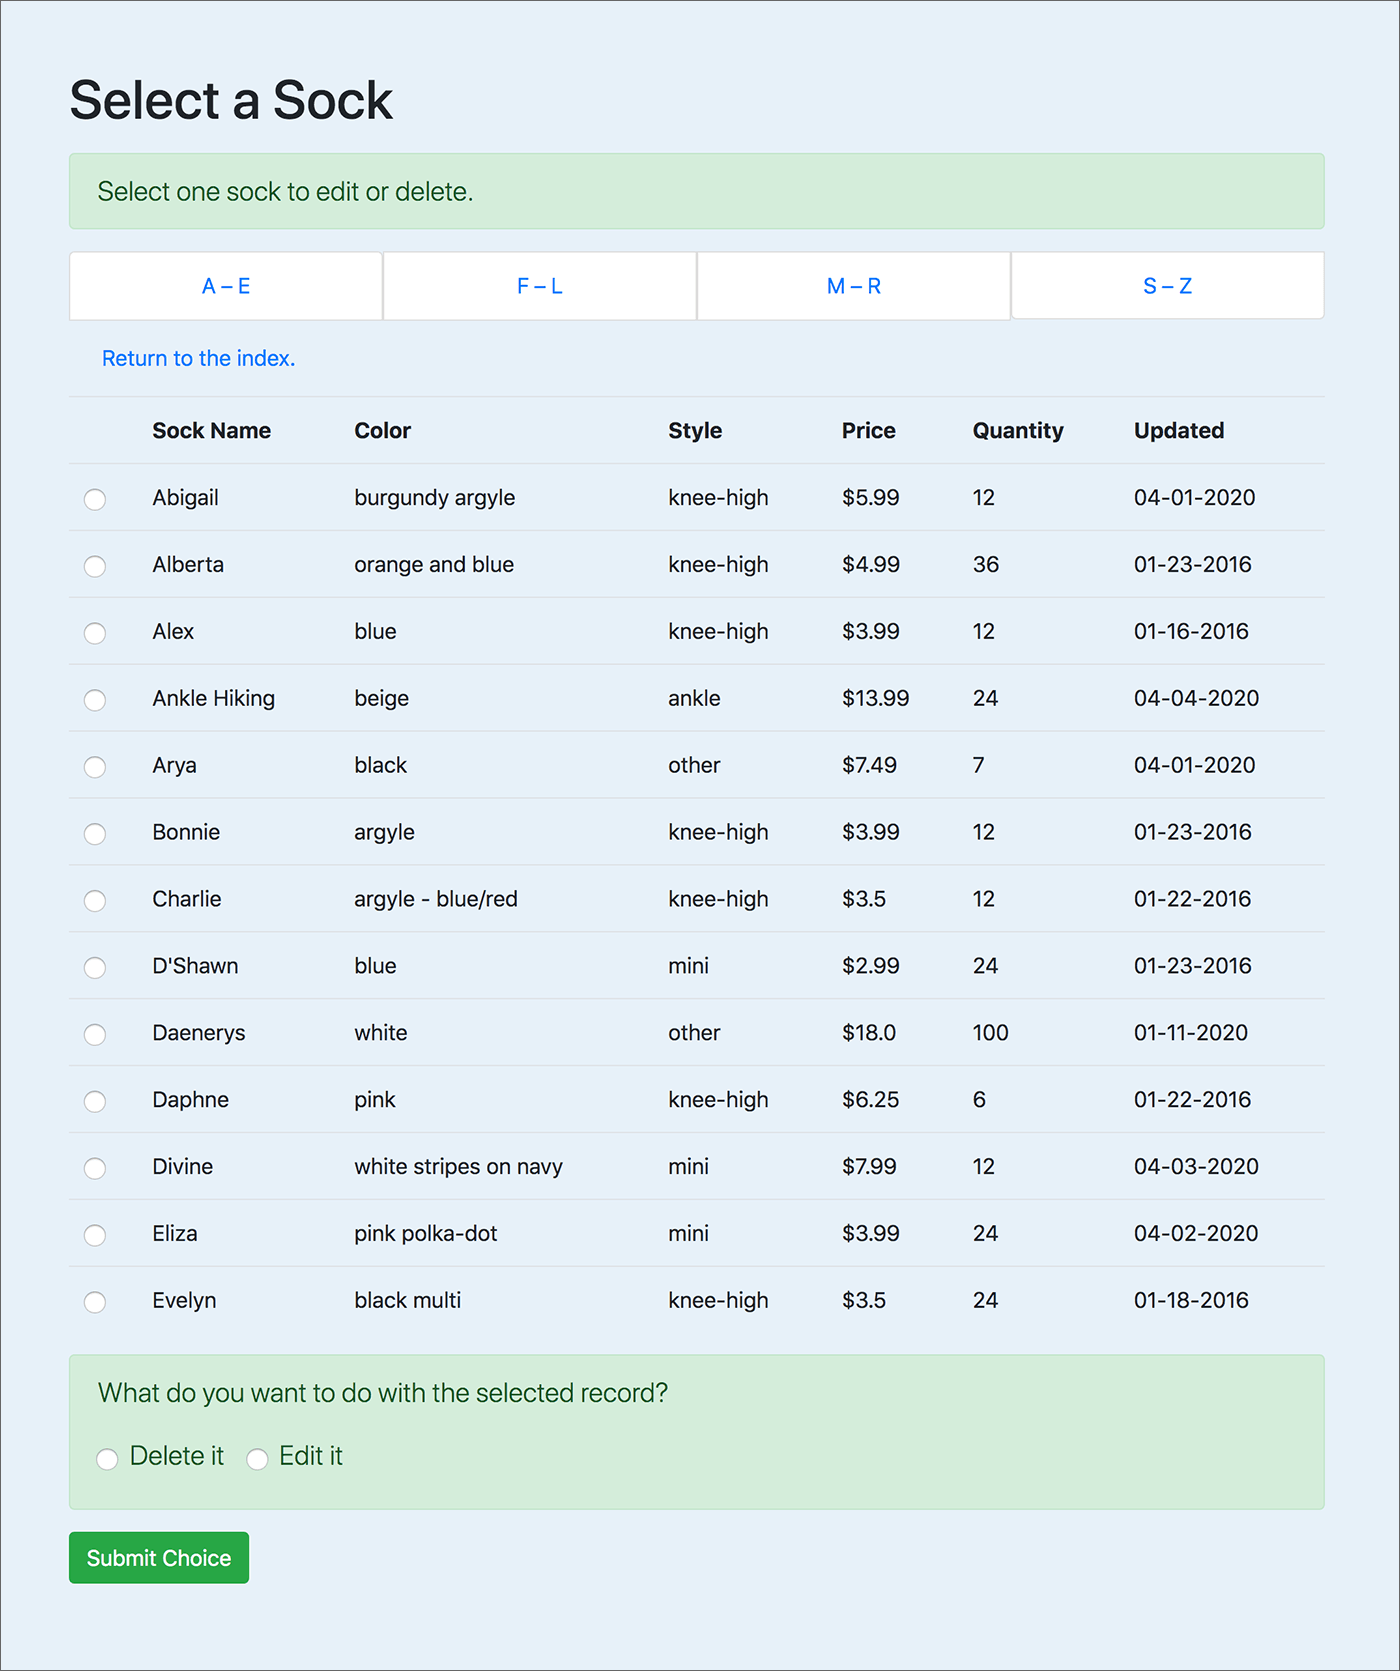
Above: /select_record/<letters> — route; select_record(letters) — function; select_record.html — template
The value encoded in the radio button is the unique ID (the primary key) for the sock record in the database. For example:
<tr>
    <td class="center-align"><input type="radio" name="id" value="44" required></td>
    <td>Evelyn</td>
    <td>black multi</td>
The form in the template select_record.html has this action attribute in the form tag:
action="{{ url_for('edit_or_delete') }}"
As a result, submitting that form calls the route for the edit_or_delete() function:
154 155 156 157 158 159 160 161 162 163 164 | # edit or delete - come here from form in /select_record
@app.route('/edit_or_delete', methods=['POST'])
def edit_or_delete():
id = request.form['id']
choice = request.form['choice']
sock = Sock.query.filter(Sock.id == id).first()
# two forms in this template
form1 = AddRecord()
form2 = DeleteForm()
return render_template('edit_or_delete.html', sock=sock, form1=form1, form2=form2, choice=choice)
|
The unique ID is used in the database query (line 159) to retrieve the selected record from the database.
Note
The difference between ending the database query with .first() is that it returns only one record, while .all() returns all matching records as a list. Do not try to loop over a result obtained with .first().
The template rendered by that route — edit_or_delete.html — includes an if/else to determine whether to show the form for deleting a record or the form for updating a record. It tests the value of the variable choice, which came from the form (line 158) and is passed to the template (line 163). The precise record that was selected is retrieved from the database in line 159 (highlighted) and passed to the template in line 163.
If you chose to delete, this is what you’ll see:
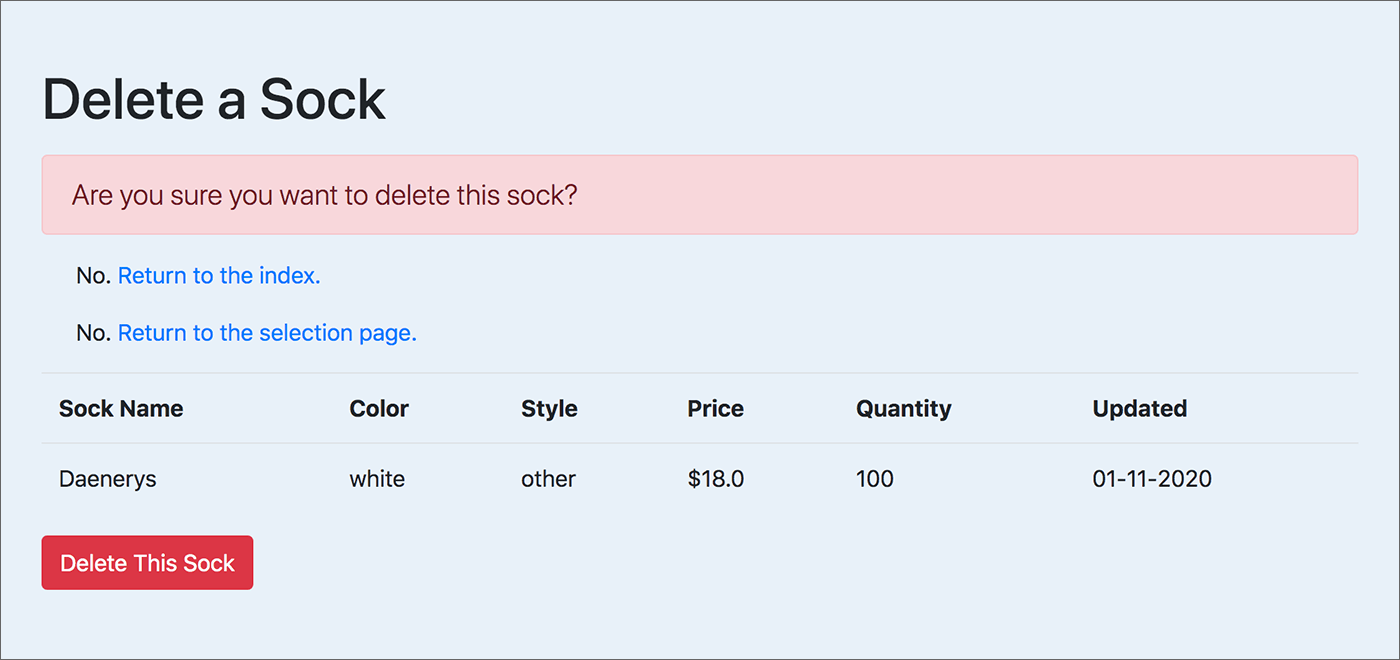
Above: /edit_or_delete — route; edit_or_delete() — function; edit_or_delete.html — template
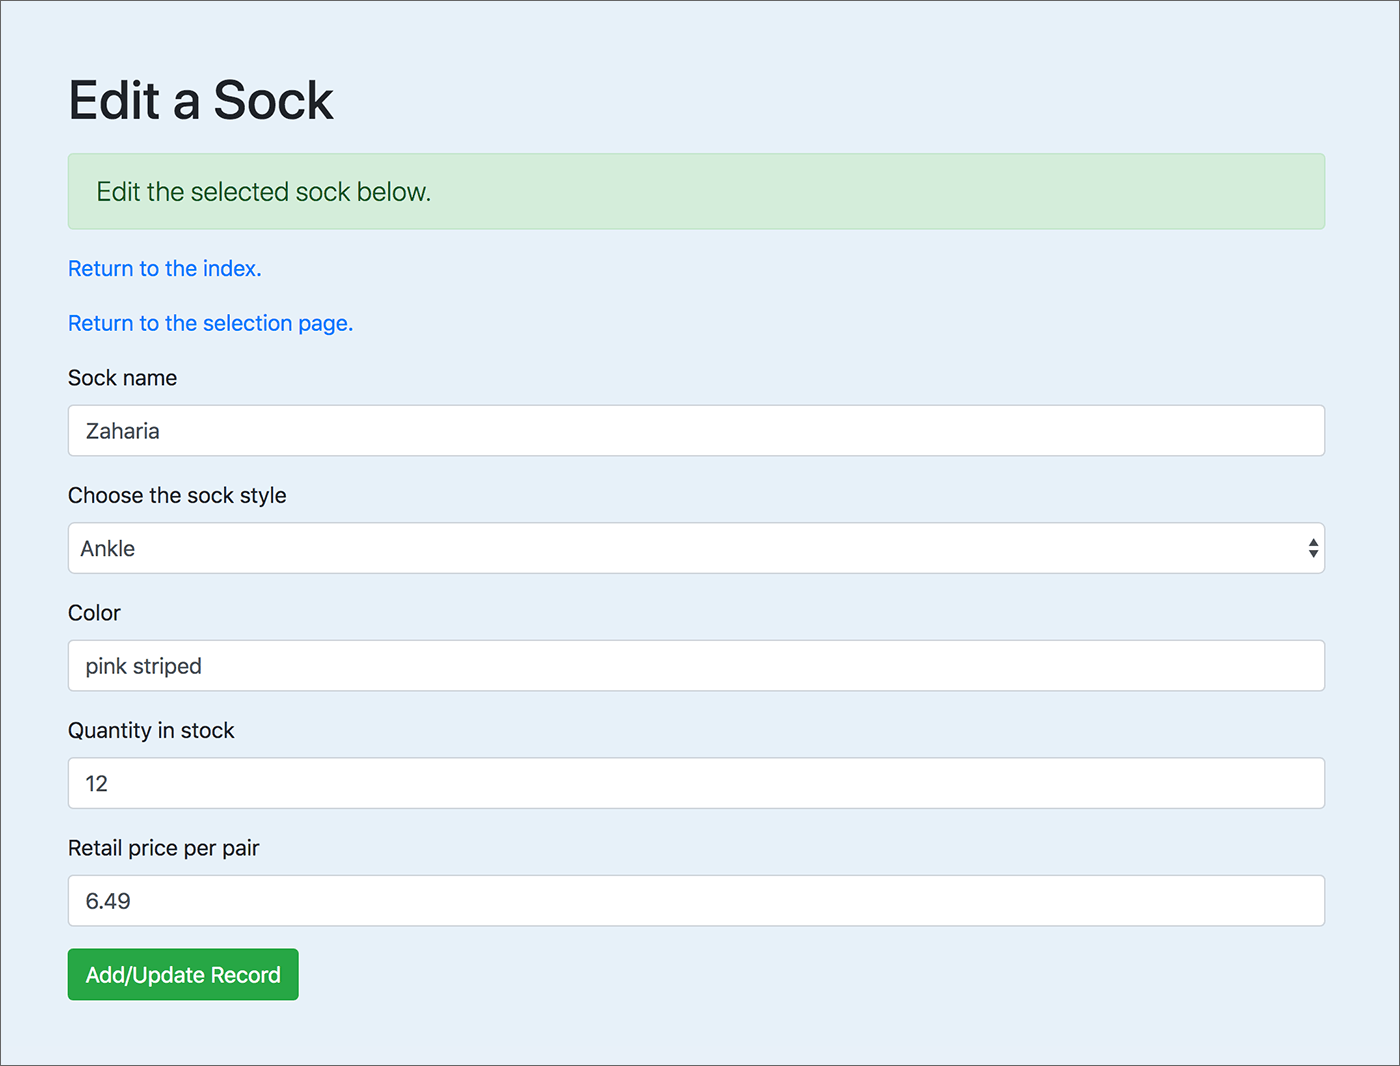
If you chose to edit, you’ll see the form with values filled in from the record that was retrieved from the database.:
Above: /edit_or_delete — route; edit_or_delete() — function; edit_or_delete.html — template
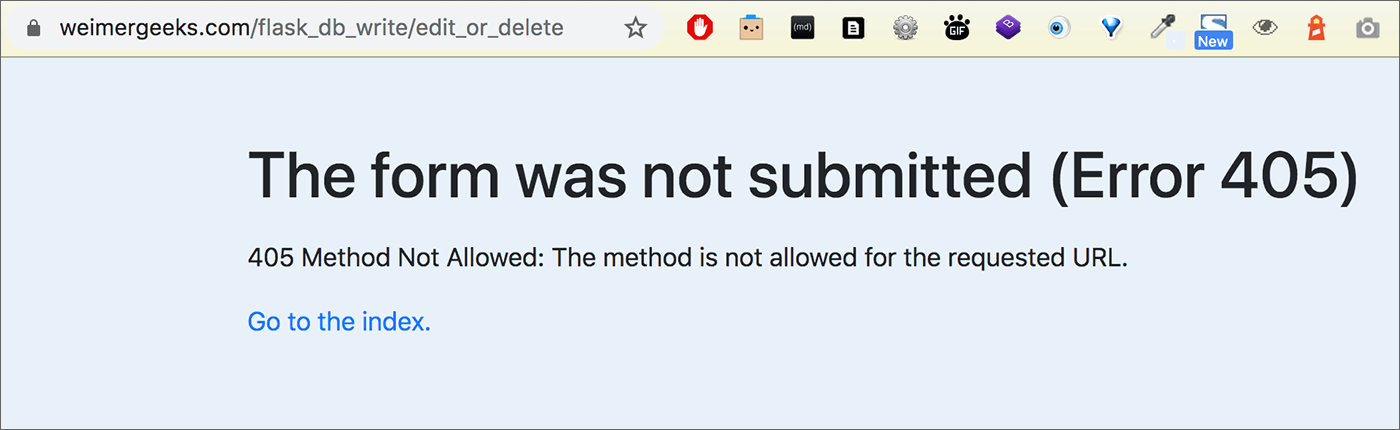
If you opened that route without submitting the form:
Above: /edit_or_delete — route; edit_or_delete() — function; edit_or_delete.html — template
Important
All of the three previous screenshots come from the same route, /edit_or_delete. The template determines whether to show “Delete a Sock” or “Edit a Sock” based on the value of the variable choice. The third screenshot is an error template (error.html) that renders automatically if the HTTP request was get and not post — because:
@app.route('/edit_or_delete', methods=['POST'])
Deleting
By submitting the deletion form that appears in the enter_or_delete.html template, the user causes the deletion to occur. The action in the form is:
action="{{ url_for('delete_result') }}"
And so this route function is called:
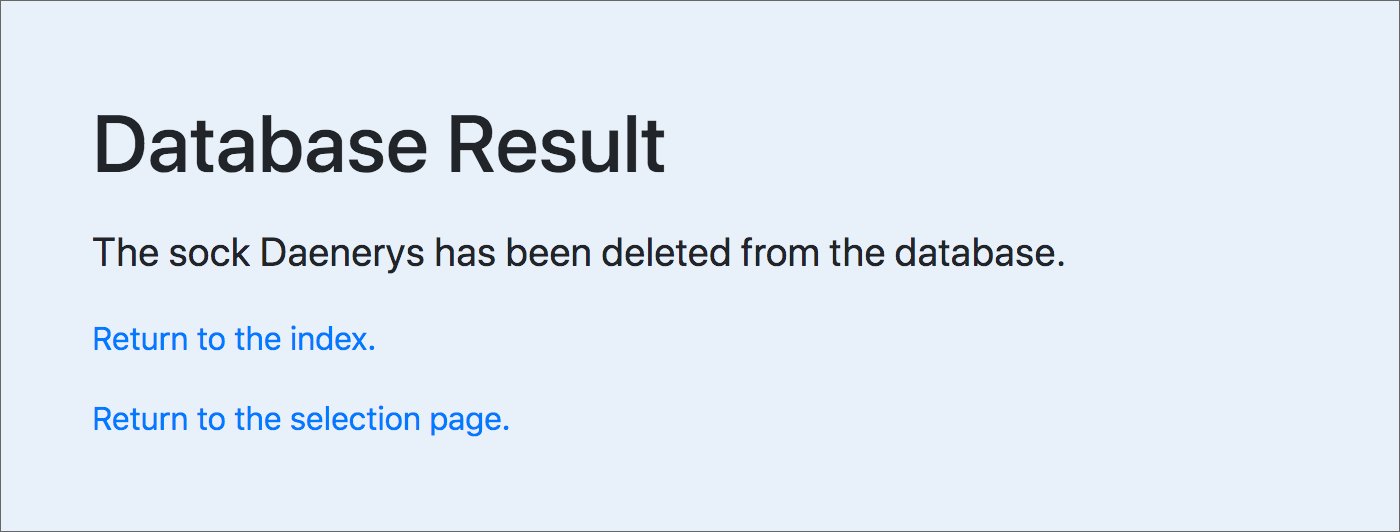
165 166 167 168 169 170 171 172 173 174 175 176 177 178 179 | # result of delete - this function deletes the record
@app.route('/delete_result', methods=['POST'])
def delete_result():
id = request.form['id_field']
purpose = request.form['purpose']
sock = Sock.query.filter(Sock.id == id).first()
if purpose == 'delete':
db.session.delete(sock)
db.session.commit()
message = f"The sock {sock.name} has been deleted from the database."
return render_template('result.html', message=message)
else:
# this calls an error handler
abort(405)
|
The record deletion is performed in lines 172–173. The unique ID for the record was obtained from the form. The record was retrieved from the database in line 170. A message will be passed to the template named result.html (line 175), and this is the result:
Editing
Alternatively, by submitting the edit/update form that appears in the enter_or_delete.html template, the user causes the record to be changed in the database. The action in the form is:
action="{{ url_for('edit_result') }}"
And so this route function is called:
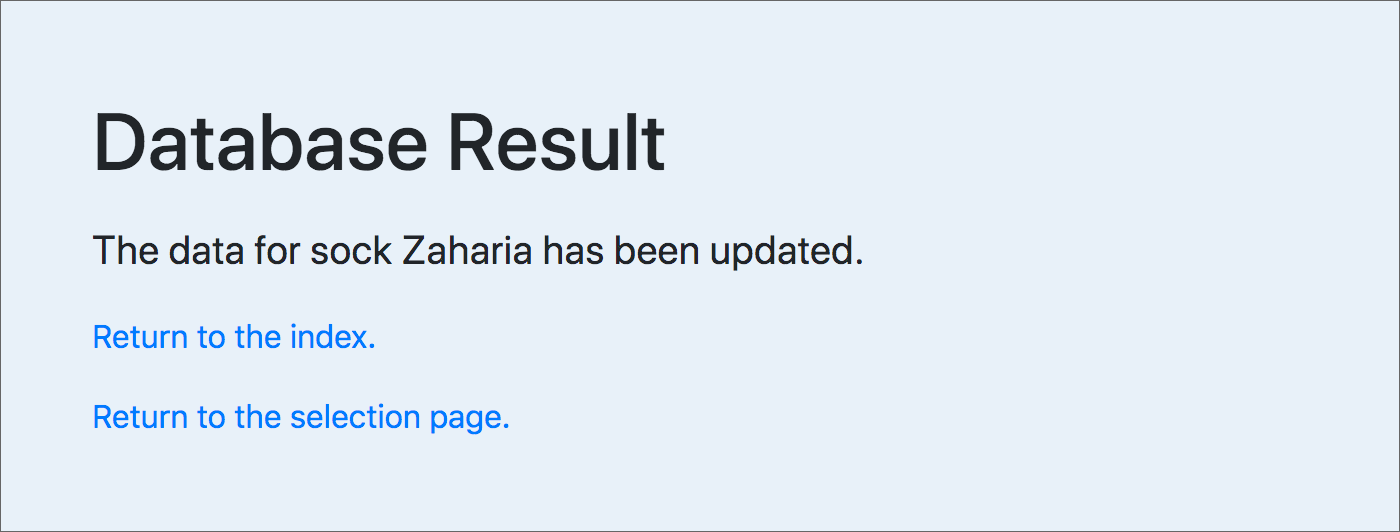
180 181 182 183 184 185 186 187 188 189 190 191 192 193 194 195 196 197 198 199 200 201 202 | # result of edit - this function updates the record
@app.route('/edit_result', methods=['POST'])
def edit_result():
id = request.form['id_field']
# call up the record from the database
sock = Sock.query.filter(Sock.id == id).first()
# update all values
sock.name = request.form['name']
sock.style = request.form['style']
sock.color = request.form['color']
sock.quantity = request.form['quantity']
sock.price = request.form['price']
# get today's date from function, above all the routes
sock.updated = stringdate()
form1 = AddRecord()
if form1.validate_on_submit():
# update database record
db.session.commit()
# create a message to send to the template
message = f"The data for sock {sock.name} has been updated."
return render_template('result.html', message=message)
else:
|
This is a bit more complicated than the deletion function, but recall the way we added a new record, at the start of this chapter. Note that we are in fact using the same form that we used there. We are validating the data in exactly the same way (the else clause following line 202 is practically the same).
In lines 187–191, we add the form data to sock — which contains the record retrieved from the database in line 185. However, we do not write the record back to the database unless the form data validates. This is also very similar to the way we added a new record. The most significant difference between this function and that one is that when we add a new record we use db.session.add(record) and here, we do not. We only commit the changes with:
db.session.commit()
A message will be passed to the template named result.html (line 201), and this is the result:
Important
Both route functions — the one for deleting a record AND the one for editing a record — render the same template, result.html.
Summary: Delete or update (and a diagram)
This is a lot, with three different forms and three different templates. Perhaps this diagram will help.
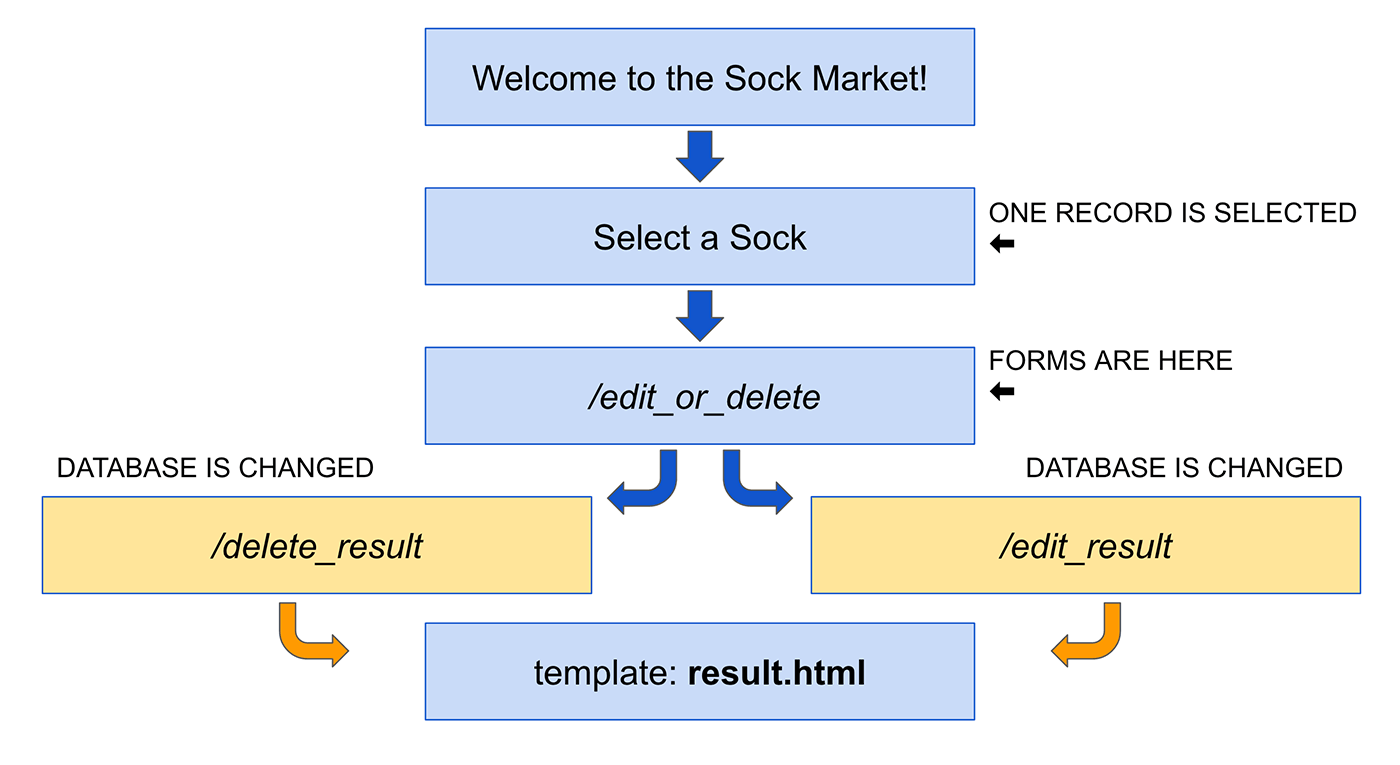
Of course this is not the only way to build it — Flask gives us a lot of freedom to design templates and use routes whatever way is best for the application we need to build.
Conclusion & tips
If you’re making changes to a database via a Flask app, you are likely to use HTML forms.
A key fact to remember is that if you use the WTForms/flask_wtf quick_form(), you do not have a lot of options for that form outside the class you build in the Flask app. See the documentation.
If you want more flexibility, you can encode a form like the two forms in the template edit_or_delete.html — both of those have values assigned to each field. See the complete template here.
For even more flexibility, you can write the entire form from scratch, as seen in the template select_record.html. In that case, you do not need to build a Python class for the form.
If you do not assign an action to a form, it will call the same route again when you submit it. If you want it to call a different route, assign that route as the value of action= — using Jinja template syntax, like this:
action="{{ url_for('edit_result') }}"
Note
It is always the function name as the argument for url_for() — never the template name. If the function is named differently from the route URL, be sure to use the function name.
When writing the decorator for a route, consider whether you need to assign ONLY the post method to it, or BOTH post and get. In the socks app, only one route requires both post and get:
@app.route('/add_record', methods=['GET', 'POST'])
Three routes require only post:
@app.route('/edit_or_delete', methods=['POST'])
@app.route('/delete_result', methods=['POST'])
@app.route('/edit_result', methods=['POST'])
The difference is this: for /add_record the user needs to be able to open the unfilled form with a regular link. That is the get method — the default for every regular web page. But when a route runs as the result of a form submission, the method post is required, because only post can convey form data to the server as attached data (not visible in the browser address bar). The /add_record route both opens the (empty) form and processes the form.
The other three routes listed above ONLY run when a form is posted. If you try to open those directly, you’ll see an error message.
.